서종호(가시다)님의 AWS EKS Workshop Study(AEWS) 6주차 학습 내용을 기반으로 합니다.
들어가며
EKS SaaS GitOps 솔루션은 실습에 필요한 도구가 상당히 많습니다. AWS CLI, Terraform, kubectl, Helm, Flux CLI, yq, jq 등 로컬 환경마다 버전이 달라 생기는 시행착오를 줄이기 위해, 이 솔루션은 code-server 기반 VS Code 실습 환경을 EC2에 자동 구성하는 CloudFormation 템플릿을 제공합니다.
이번 장에서는 이 CloudFormation 템플릿(helpers/vs-code-ec2.yaml)이 내부적으로 어떤 리소스를 만들고, SSM Document를 통해 어떤 부트스트랩 절차를 수행하는지를 읽어보고, 실제 배포 및 검증까지 진행합니다.
참고: 전체 배포는 약 24~30분 정도 소요되며, 이는 CloudFormation 스택 자체보다는 SSM Document가 실행하는 Terraform 기반 실습 환경 구축 시간이 대부분을 차지합니다.
1. 사전 준비 사항
실습을 진행하기 전 아래 사항을 확인하세요.
- AWS 계정: 관리자 권한(AdministratorAccess)을 부여받은 IAM 사용자 또는 역할로 진행 권장
- 리전: 배포하려는 리전에서 EKS, VPC, EC2 리소스를 만들 수 있는 서비스 한도 여유분 확보
- 비용: EC2(t3.large), EKS 클러스터, NAT Gateway 등의 비용이 실습 기간 동안 발생합니다. 실습 종료 후 반드시 CloudFormation 스택 및 Terraform 리소스를 삭제하세요.
2. CloudFormation 스택 배포
2-1. 템플릿 파일 준비
AWS Samples 리포지토리에서 helpers/vs-code-ec2.yaml 파일을 다운로드합니다.
git clone https://github.com/aws-samples/eks-saas-gitops.git
cd eks-saas-gitops/helpers
ls -al vs-code-ec2.yaml
혹은 한국어 README 브랜치의 vs-code-ec2.yaml 파일을 직접 다운로드해도 됩니다.
2-2. CloudFormation 스택 생성
AWS Management Console에서 다음 절차를 수행합니다.
- CloudFormation 콘솔 → 스택 생성 → 새 리소스 사용(표준) 선택
- 템플릿 파일 업로드를 선택하고
vs-code-ec2.yaml업로드 - 다음 클릭 후 스택 이름 입력 (예:
eks-saas-gitops-vscode) - 파라미터 구성
EnvironmentName:eks-saas-gitops(기본값 유지 권장)InstanceType:t3.large(실습에 최소 권장 사양)AllowedIP: 본인의 공인 IP/32 (예:1.2.3.4/32)
- 다음 클릭 → 구성 검토 → 스택 생성
- CloudFormation 스택이
CREATE_COMPLETE상태가 될 때까지 대기 (약 30분)
3. CloudFormation 템플릿 분석
이 CloudFormation 템플릿은 SSM Document → Terraform → EKS 실습 환경이라는 다단계 부트스트랩 체인을 구성합니다. 주요 리소스를 그룹별로 나눠 살펴보겠습니다.
3-1. IAM: 실습용 관리자 역할
EC2Role:
  Type: AWS::IAM::Role
  Properties:
    RoleName: eks-saas-gitops-admin
    AssumeRolePolicyDocument:
      Statement:
        - Effect: Allow
          Principal:
            Service:
              - ec2.amazonaws.com
              - ssm.amazonaws.com
              - eks.amazonaws.com
              - codebuild.amazonaws.com
          Action:
            - sts:AssumeRole
    ManagedPolicyArns:
      - arn:aws:iam::aws:policy/AdministratorAccess
실습 편의를 위해 AdministratorAccess 관리형 정책을 부여합니다. EC2, SSM, EKS, CodeBuild가 모두 이 역할을 Assume할 수 있도록 Trust Policy가 열려 있는 점이 특징입니다.
운영 관점 주의: 실제 프로덕션 환경에서는 절대 AdministratorAccess를 사용하지 말고, 최소 권한 원칙(Principle of Least Privilege)에 따라 필요한 정책만 연결해야 합니다. 본 템플릿은 학습 편의성을 위한 설계입니다.3-2. 네트워크: VPC와 Public Subnet
VPC:
  Properties:
    CidrBlock: "10.0.0.0/16"
    Tags:
      - Key: Name
        Value: eks-saas-gitops-vscode-vpc   # Terraform이 참조할 태그
10.0.0.0/16 CIDR의 VPC와 10.0.1.0/24 Public Subnet 하나만 구성합니다. 주목할 점은 VPC의 Name 태그가 eks-saas-gitops-vscode-vpc로 고정되어 있다는 것인데, 이는 이후 실행되는 Terraform 모듈이 이 태그를 기준으로 VPC를 식별하기 때문입니다.
네트워크 구성은 단순합니다:
- Internet Gateway를 VPC에 연결
- Public Route Table에
0.0.0.0/0 → IGW기본 경로 추가 - Public Subnet을 해당 Route Table에 연결
3-3. S3 Bucket: SSM 실행 결과 저장
OutputBucket:
  Type: AWS::S3::Bucket
  DeletionPolicy: Retain
  Properties:
    VersioningConfiguration:
      Status: Enabled
    BucketEncryption:
      ServerSideEncryptionConfiguration:
        - ServerSideEncryptionByDefault:
            SSEAlgorithm: AES256
    PublicAccessBlockConfiguration:
      BlockPublicAcls: true
      BlockPublicPolicy: true
      IgnorePublicAcls: true
      RestrictPublicBuckets: true
SSM Document 실행 로그를 보관하기 위한 S3 버킷입니다. DeletionPolicy: Retain이 걸려 있어 CloudFormation 스택을 삭제해도 버킷은 남습니다. 실습 종료 후 수동 삭제 필요 리소스라는 점을 기억해 두세요.
3-4. SSM Document: 부트스트랩의 핵심
이 템플릿에서 가장 중요한 부분입니다. AWS::SSM::Document가 EC2 인스턴스 내부에서 실행할 셸 명령을 정의하고, AWS::SSM::Association이 특정 태그(SSMBootstrapSaaSGitOps=Active)가 붙은 인스턴스에 대해 자동으로 이 Document를 실행합니다.
핵심 설치 단계를 요약하면 다음과 같습니다.
① code-server 설치 및 비밀번호 설정
curl -fsSL https://code-server.dev/install.sh | sudo -u ec2-user sh
export CODER_PASSWORD=$(openssl rand -base64 12)
# 생성된 비밀번호를 SSM Parameter Store(coder-password)에 저장
aws ssm put-parameter --name 'coder-password' --type 'String' --value "$CODER_PASSWORD" --overwrite
랜덤 비밀번호를 생성해 SSM Parameter Store에 저장합니다. 나중에 VS Code에 접속할 때 이 값을 조회해서 사용합니다.
② 필수 도구 설치
yum install -y docker git jq bash-completion moreutils gettext git-lfs tree
# kubectl
curl -LO "https://dl.k8s.io/release/$(curl -L -s https://dl.k8s.io/release/stable.txt)/bin/linux/amd64/kubectl"
# Helm
curl https://raw.githubusercontent.com/helm/helm/main/scripts/get-helm-3 | bash
# Flux CLI (v2.7.5 고정)
curl --silent --location "https://github.com/fluxcd/flux2/releases/download/v2.7.5/flux_2.7.5_$(uname -s)_amd64.tar.gz" | tar xz -C /tmp
# yq
wget https://github.com/mikefarah/yq/releases/latest/download/yq_linux_amd64 -O /usr/bin/yq
# Terraform (HashiCorp repo)
yum-config-manager --add-repo https://rpm.releases.hashicorp.com/AmazonLinux/hashicorp.repo
yum -y install terraform
실습에 필요한 모든 CLI 도구가 미리 설치됩니다. Flux CLI 버전이 v2.7.5로 고정되어 있다는 점에 주의하세요. 이는 GitOps 실습에서 사용하는 Flux 컴포넌트와의 호환성을 보장하기 위함입니다.
③ 리포지토리 클론 및 Terraform 실행
git clone https://github.com/aws-samples/eks-saas-gitops.git /home/ec2-user/environment/eks-saas-gitops
echo 'solution=true' > /home/ec2-user/environment/eks-saas-gitops/terraform/workshop/terraform.tfvars

cd /home/ec2-user/environment/eks-saas-gitops/terraform
sudo -u ec2-user ./install.sh ${AWS_REGION} "{{allowedIp}}" > /home/ec2-user/environment/terraform-install.log 2>&1
CloudFormation 스택이 생성된 리전 정보(AWS_REGION)와 사용자가 지정한 AllowedIP를 인자로 받아 install.sh를 실행합니다. 이 스크립트가 내부적으로 terraform init → plan → apply를 수행하며 EKS 클러스터와 관련 리소스를 프로비저닝합니다.
④ Wait Condition으로 완료 신호 전달
if [ $? -eq 0 ]; then
  curl -X PUT -H 'Content-Type: application/json' \
    --data-binary '{"Status":"SUCCESS",...}' "$WAIT_HANDLE_URL"
else
  curl -X PUT -H 'Content-Type: application/json' \
    --data-binary '{"Status":"FAILURE",...}' "$WAIT_HANDLE_URL"
fi
Terraform 설치 결과를 AWS::CloudFormation::WaitCondition에 전달합니다. 이 덕분에 CloudFormation 스택의 CREATE_COMPLETE 상태 = Terraform 실습 환경까지 모두 준비 완료를 의미하게 됩니다. 단순히 EC2 인스턴스가 실행된 시점이 아니라, 내부 부트스트랩까지 모두 완료된 시점에 스택이 완료 처리되는 구조입니다.
3-5. EC2 Instance 및 Security Group
EC2Instance:
  Properties:
    ImageId: !Ref LatestAmiId     # Amazon Linux 2023 latest (SSM Parameter)
    InstanceType: !Ref InstanceType
    IamInstanceProfile: !Ref EC2InstanceProfile
    Tags:
      - Key: SSMBootstrapSaaSGitOps
        Value: Active             # SSM Association의 타겟 태그
AMI는 Amazon Linux 2023의 최신 버전을 SSM Parameter Store에서 동적으로 참조합니다. SSMBootstrapSaaSGitOps=Active 태그가 붙어 있어 앞서 정의된 SSM Association이 이 인스턴스에 자동으로 부트스트랩 Document를 실행합니다.
Security Group은 8080 포트만 AllowedIP에 대해 Inbound를 허용합니다. SSH(22번)는 열려 있지 않은데, 이는 Session Manager 기반 접속을 전제로 하고 있기 때문입니다. 보안 관점에서 좋은 설계라고 볼 수 있습니다.
4. VS Code for the Web 접속
4-1. 접속 URL 및 비밀번호 확인
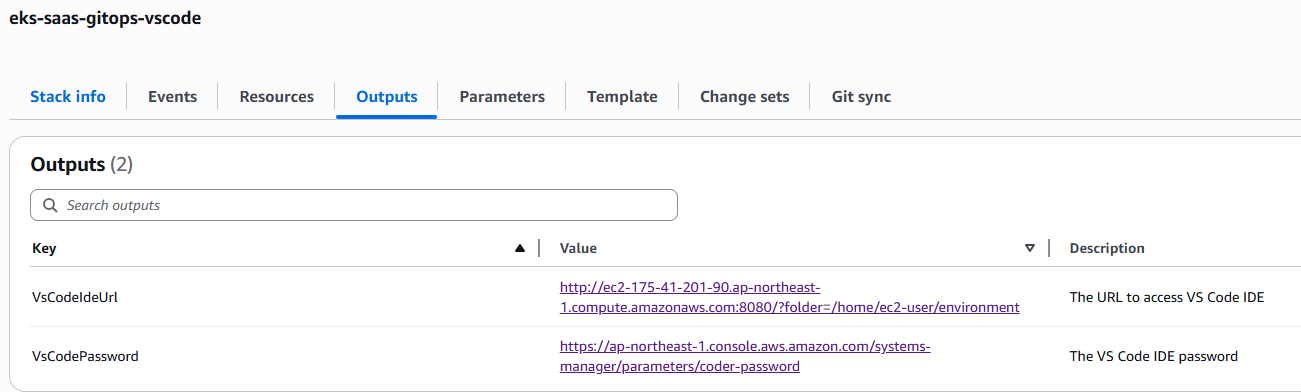
CloudFormation 스택의 Outputs 탭에서 두 가지 값을 확인합니다.
- VsCodeIdeUrl:
http://<EC2PublicDnsName>:8080/?folder=/home/ec2-user/environment - VsCodePassword: SSM Parameter Store의
coder-password파라미터 콘솔 링크
또는 CLI로 비밀번호를 직접 조회할 수도 있습니다:
aws ssm get-parameter --name 'coder-password' --with-decryption \
  --query 'Parameter.Value' --output text
4-2. 브라우저로 접속
VsCodeIdeUrl을 브라우저에 붙여넣고, 비밀번호를 입력하면 code-server 기반 VS Code 화면이 나타납니다. /home/ec2-user/environment 경로가 기본 워크스페이스로 열려 있으며, 클론된 eks-saas-gitops 리포지토리를 바로 탐색할 수 있습니다.
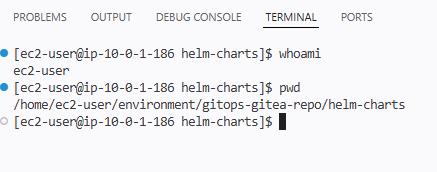
4-3. 터미널에서 기본 환경 확인
VS Code 상단 메뉴에서 Terminal → New Terminal을 열고 아래 명령으로 환경을 확인합니다.
aws sts get-caller-identity
kubectl version --client
helm version
flux --version
terraform version

# EKS 클러스터 kubeconfig 업데이트
aws eks update-kubeconfig --region $AWS_REGION --name <terraform-output-cluster-name>
kubectl get nodes
kubectl get ns
노드가 Ready 상태로 출력되고 네임스페이스에 flux-system 등이 보인다면 정상적으로 배포가 된 것입니다. 또한 터미널에서 아래와 같이 명령어 수행 시 정상적으로 가상 환경이 배포되었는지 확인 가능합니다.
5. 테라폼 및 OpenTofu 컨트롤러 실습
앞서 섹션에서 GitOps의 "선언적 상태 관리"와 플랫폼 엔지니어링에서 말하는 추상화(abstraction) 의 가치에 대해 짚었음. 이번 실습에서는 이 두 가지가 Terraform 모듈과 Tofu 컨트롤러(tf-controller)를 통해 실제로 어떻게 구현되는지를 직접 확인해 볼 예정.
실습은 두 단계로 진행:
- Terraform 모듈 직접 테스트 — 모듈이 어떤 리소스를 어떻게 추상화하는지 CLI로 검증
- Tofu 컨트롤러로 GitOps 통합 — Git push만으로 AWS 리소스가 생성/삭제되는 플로우 구현, 통합된 구조의 흐름은 대략 아래와 같다.
5.1 모듈 구조 파악
애플리케이션 인프라는 Terraform 모듈로 관리되며, 저장소 내 모듈 구조는 다음과 같음
tree /home/ec2-user/environment/gitops-gitea-repo/terraform/modules/ -L 2

gitops-gitea-repo/terraform/modules/
├── flux_cd/           # EKS에 Flux를 설치하는 데 필요한 리소스
├── gitea/             # Gitea 저장소에 필요한 리소스
├── gitops-saas-infra/ # 워크숍 전체 인프라 구성 리소스
└── tenant-apps/       # 테넌트 애플리케이션 전용 인프라 구성 요소
    ├── data.tf
    ├── main.tf
    ├── outputs.tf
    ├── variables.tf
    └── versions.tf
이 중 핵심은 tenant-apps 모듈. 이 모듈 하나로 새 테넌트 온보딩 시 필요한 다음 리소스를 한 번에 프로비저닝할 수 있음:
- SQS 큐 (메시지 소비용)
- DynamoDB 테이블 (메시지 저장소)
- IRSA (IAM Role for Service Account) — producer/consumer 각각
- IAM Policy 및 Role Policy Attachment
- SSM Parameter (큐/테이블 엔드포인트 저장)
Terraform 모듈 계층 관계
Terraform Aggregated Module → Terraform Module → Terraform Resource 관계tenant-apps는iam-role-for-service-accounts-eks같은 외부 모듈을 내부적으로 호출하는 Aggregated Module각 Aggregated Module은 여러 Module을 조합하여 하나의 비즈니스 단위(= 테넌트 온보딩)를 추상화결과적으로 사용자는tenant_id,enable_producer,enable_consumer같은 도메인 변수만 다루면 됨
이 계층 구조가 바로 플랫폼 엔지니어링이 말하는 "소비자(애플리케이션 팀)는 인프라 디테일을 몰라도 되는" 상태를 만드는 방식.
5.2 Terraform 모듈 직접 테스트
테스트 Terraform 파일 생성
먼저 모듈이 어떻게 동작하는지 CLI로 직접 실행해 볼 예정. 테스트용 Terraform 파일을 생성:
cd /home/ec2-user/environment/gitops-gitea-repo/

cat << EOF > terraform_test.tf
terraform {
  required_providers {
    aws = {
      source  = "hashicorp/aws"
      version = "5.100.0"
    }
  }
}

provider "aws" {}

module "test_tenant_apps" {
  source          = "./terraform/modules/tenant-apps"
  tenant_id       = "test"
  enable_producer = true
  enable_consumer = true
}
EOF
이 설정만으로 테넌트 test를 위한 producer/consumer 인프라가 프로비저닝될 예정.
terraform init
terraform init
실행 결과:
Initializing the backend...
Initializing modules...
- test_tenant_apps in terraform/modules/tenant-apps
Downloading registry.terraform.io/terraform-aws-modules/iam/aws 5.30.0 for test_tenant_apps.consumer_irsa_role...
- test_tenant_apps.consumer_irsa_role in .terraform/modules/test_tenant_apps.consumer_irsa_role/modules/iam-role-for-service-accounts-eks
Downloading registry.terraform.io/terraform-aws-modules/iam/aws 5.30.0 for test_tenant_apps.producer_irsa_role...
- test_tenant_apps.producer_irsa_role in .terraform/modules/test_tenant_apps.producer_irsa_role/modules/iam-role-for-service-accounts-eks
Initializing provider plugins...
- Finding hashicorp/aws versions matching ">= 4.0.0, >= 5.0.0, 5.100.0"...
- Finding hashicorp/random versions matching ">= 2.0.0"...
- Installing hashicorp/aws v5.100.0...
- Installed hashicorp/aws v5.100.0 (signed by HashiCorp)
- Installing hashicorp/random v3.8.1...
- Installed hashicorp/random v3.8.1 (signed by HashiCorp)

Terraform has been successfully initialized!
여기서 주목할 점: tenant-apps 모듈이 terraform-aws-modules/iam/aws 5.30.0 버전의 iam-role-for-service-accounts-eks 하위 모듈을 producer/consumer 각각 따로 다운로드함. 이것이 바로 Aggregated Module의 실체.
terraform plan (enable_producer = true)
terraform plan | tee -a tfplan-1.txt
결과 요약 (전체 리소스 목록):
Terraform will perform the following actions:

  # module.test_tenant_apps.aws_dynamodb_table.consumer_ddb[0] will be created
  # module.test_tenant_apps.aws_iam_policy.consumer-iampolicy[0] will be created
  # module.test_tenant_apps.aws_iam_policy.producer-iampolicy[0] will be created
  # module.test_tenant_apps.aws_sqs_queue.consumer_sqs[0] will be created
  # module.test_tenant_apps.aws_ssm_parameter.dedicated_consumer_ddb[0] will be created
  # module.test_tenant_apps.aws_ssm_parameter.dedicated_consumer_sqs[0] will be created
  # module.test_tenant_apps.random_string.random_suffix will be created
  # module.test_tenant_apps.module.consumer_irsa_role[0].aws_iam_role.this[0] will be created
  # module.test_tenant_apps.module.consumer_irsa_role[0].aws_iam_role_policy_attachment.this["policy"] will be created
  # module.test_tenant_apps.module.producer_irsa_role[0].aws_iam_role.this[0] will be created
  # module.test_tenant_apps.module.producer_irsa_role[0].aws_iam_role_policy_attachment.this["policy"] will be created

Plan: 11 to add, 0 to change, 0 to destroy.
11개의 리소스가 생성될 예정이며, 특히 IRSA 관련 assume_role_policy의 trust relationship이 흥미로움:
{
  "Statement": [
    {
      "Action": "sts:AssumeRoleWithWebIdentity",
      "Condition": {
        "StringEquals": {
          "oidc.eks.us-west-2.amazonaws.com/id/615D08FA0ED3FDC6010D5C7510A5A6C9:aud": "sts.amazonaws.com",
          "oidc.eks.us-west-2.amazonaws.com/id/615D08FA0ED3FDC6010D5C7510A5A6C9:sub": "system:serviceaccount:test:test-consumer"
        }
      },
      "Effect": "Allow",
      "Principal": {
        "Federated": "arn:aws:iam::656796372676:oidc-provider/oidc.eks.us-west-2.amazonaws.com/id/615D08FA0ED3FDC6010D5C7510A5A6C9"
      }
    }
  ]
}
변수 하나로 배포 범위 제어하기
이번엔 enable_producer를 false로 바꾸고 다시 실행:
cat << EOF > terraform_test.tf
terraform {
  required_providers {
    aws = {
      source = "hashicorp/aws"
      version = "5.100.0"
    }
  }
}

provider "aws" {}

module "test_tenant_apps" {
  source          = "./terraform/modules/tenant-apps"
  tenant_id       = "test"
  enable_producer = false
  enable_consumer = true
}
EOF

terraform plan | tee -a tfplan-2.txt
결과:
Plan: 10 to add, 0 to change, 0 to destroy.
plan 결과 비교
diff tfplan-1.txt tfplan-2.txt
생각해보기: enable_producer = false로 변경했을 때
- 11개 → 10개로 1개 리소스 감소
- 구체적으로 제외된 리소스:
module.producer_irsa_role[0].aws_iam_role.this[0] - 그러나
aws_iam_policy.producer-iampolicy[0]은 여전히 생성됨 → 모듈 내부에서 policy 자체는 항상 만들되, Role과 Policy Attachment만enable_producer플래그로 조건부 생성하는 구조
추가로 enable_producer = false 케이스에서는 aws_iam_role_policy_attachment.sto-readonly-role-policy-attach[0]라는 공유 Role에 대한 attachment가 따로 생성됨을 확인할 수 있었음. 즉, producer가 disabled인 테넌트는 개별 Role 대신 공용 Pool Role을 참조하도록 설계됨 — Pool 기반 SaaS tenancy 모델과 연결되는 지점.
테스트 파일 정리:
rm -rf /home/ec2-user/environment/gitops-gitea-repo/terraform_test.tf
5.3 Tofu 컨트롤러 통합: GitOps로 Terraform 실행하기
지금까지는 Terraform을 직접 실행했음. 이제 이 과정을 GitOps로 완전 자동화하는 방법을 살펴봄. 핵심은 Kubernetes Custom Resource Definition을 사용하는 Terraform CRD.
tf-controller 동작 흐름
1. Git 저장소에 Terraform CRD 파일 추가 (git push)
         │
         ▼
2. Flux source-controller가 변경 감지 → 조정 시작
         │
         ▼
3. tf-controller가 Terraform CRD 감지
         │
         ▼
4. tf-runner Pod 실행 → Git에서 Terraform 모듈 pull
         │
         ▼
5. terraform plan → apply → SQS, DynamoDB, IRSA 생성
         │
         ▼
6. 실행 상태/플랜을 Kubernetes Secret으로 저장 (tfstate-*, tfplan-*)
EKS/K8s 관점에서의 매핑GitRepositoryCR = Flux의 Git source (polling + artifact 생성)TerraformCR = Custom Resource가 "테라폼 실행"을 선언적 객체로 추상화tf-runnerPod = 실제terraform apply를 수행하는 Job 실행기tfstate-*Secret = state file (S3 backend 대신 K8s Secret 사용)
즉, Terraform의 imperative 실행 모델을 K8s 컨트롤러 패턴으로 감싸서 선언적으로 만든 구조.
tf-controller 상태 확인
kubectl get pod -n flux-system -l app.kubernetes.io/instance=tf-controller
kubectl get pod -n flux-system
결과:
NAME                                           READY   STATUS      RESTARTS      AGE
capacitor-dc778678d-dnfvf                      1/1     Running     2 (20m ago)   38m
flux-operator-64d8c55fd4-rkl87                 1/1     Running     0             38m
helm-controller-b7bbcf854-9xdsk                1/1     Running     0             38m
image-automation-controller-5c5fc5487b-psb4x   1/1     Running     0             38m
image-reflector-controller-547c8dbffc-5vm2r    1/1     Running     0             38m
kustomize-controller-77c78b7f4d-bstmz          1/1     Running     0             38m
notification-controller-58cfb55954-wc5bd       1/1     Running     0             38m
pool-1-tf-runner                               1/1     Running     0             5s
source-controller-6c64896f47-6j499             1/1     Running     0             38m
tf-controller-7b8cb5d4-l4w5l                   1/1     Running     0             37m
tf-controller가 Running 상태인 것, 그리고 pool-1-tf-runner가 이미 실행 중인 것(= 기존에 pool-1 테넌트 온보딩을 위해 Terraform이 돌고 있던 흔적)을 확인.
Terraform CRD 생성
example-tenant를 위한 Terraform CRD 파일 생성:
cat << EOF > /home/ec2-user/environment/gitops-gitea-repo/application-plane/production/tenants/example-tenant-terraform-crd.yaml
---
apiVersion: infra.contrib.fluxcd.io/v1alpha2
kind: Terraform
metadata:
  name: example-tenant
  namespace: flux-system
spec:
  path: ./terraform/modules/tenant-apps
  interval: 1m
  approvePlan: auto
  destroyResourcesOnDeletion: true
  sourceRef:
    kind: GitRepository
    name: terraform-v0-0-1
  vars:
    - name: tenant_id
      value: example-tenant
    - name: "enable_producer"
      value: true
    - name: "enable_consumer"
      value: true
  writeOutputsToSecret:
    name: example-tenant-infra-output
EOF
sourceRef의 버전 관리 이해하기
terraform-v0-0-1 GitRepository를 확인:
kubectl get GitRepository terraform-v0-0-1 -n flux-system -o yaml | grep -i spec -C10
결과:
spec:
  interval: 300s
  ref:
    tag: v0.0.1            # ← 특정 태그에 고정
  secretRef:
    name: flux-system
  timeout: 60s
  url: http://10.35.48.130:3000/admin/eks-saas-gitops.git
v0.0.1 태그를 참조하고 있음. 태그 존재 여부 확인:
$ git tag
v0.0.1
왜 태그를 참조하는가?
만약branch: main으로 설정하면 누군가 main에 새 커밋을 푸시할 때마다 Terraform이 재실행됨 → 인프라 모듈 변경이 모든 테넌트에 즉시 영향.
태그를 참조하면 모듈 버전을 명시적으로 승격(promote) 할 때만 변경이 반영됨. 이는 Kubernetes에서 container image를latest대신v1.2.3으로 pin하는 것과 동일한 철학.
이후 섹션에서 다룰 "Terraform 모듈 버전 업그레이드" 시나리오는 이 태그 기반 버전 관리 위에서 동작함.
kustomization.yaml 등록
Flux가 새 CRD 파일을 인식하도록 kustomization.yaml에 등록:
cat << EOF > /home/ec2-user/environment/gitops-gitea-repo/application-plane/production/tenants/kustomization.yaml
apiVersion: kustomize.config.k8s.io/v1beta1
kind: Kustomization
resources:
  - basic
  - advanced
  - premium
  - example-tenant-terraform-crd.yaml
EOF
커밋 및 푸시
cd /home/ec2-user/environment/gitops-gitea-repo/
git pull origin main
git status
git add .
git commit -am "Added example terraform CRD for testing"
git push origin main
Flux 조정 강제 실행
기본 interval을 기다리지 않고 즉시 반영:
flux reconcile source git flux-system
결과:
► annotating GitRepository flux-system in flux-system namespace
✔ GitRepository annotated
◎ waiting for GitRepository reconciliation
✔ fetched revision refs/heads/main@sha1:13b7f7204f133abc85580876e424003ecba9e022
tf-runner Pod 실행 및 로그 확인
kubectl get po -n flux-system
결과:
NAME                                           READY   STATUS      RESTARTS   AGE
example-tenant-tf-runner                       1/1     Running     0          25s   # ← 새로 생성됨
pool-1-tf-runner                               1/1     Running     0          20s
tf-controller-7b8cb5d4-l4w5l                   1/1     Running     0          42m
...
로그 스트리밍:
kubectl logs po/example-tenant-tf-runner -n flux-system -f
핵심 로그 (요약):
2026/04/13 19:47:42 Starting the runner...
{"level":"info", "msg":"write backend config", "path":"/tmp/flux-system-example-tenant/terraform/modules/tenant-apps", "config":"backend_override.tf"}
{"level":"info", "msg":"creating new terraform", "workingDir":"/tmp/flux-system-example-tenant/terraform/modules/tenant-apps"}
{"level":"info", "msg":"setting up the input variables"}
{"level":"info", "msg":"mapping the Spec.Vars"}
{"level":"info", "msg":"initializing"}
{"level":"info", "msg":"workspace select"}
{"level":"info", "msg":"creating a plan"}
{"level":"info", "msg":"save the plan"}
{"level":"info", "msg":"running apply"}

random_string.random_suffix: Creating...
random_string.random_suffix: Creation complete after 0s [id=s2v]
aws_sqs_queue.consumer_sqs[0]: Creating...
module.producer_irsa_role[0].aws_iam_role.this[0]: Creating...
module.consumer_irsa_role[0].aws_iam_role.this[0]: Creating...
aws_dynamodb_table.consumer_ddb[0]: Creating...
...
aws_dynamodb_table.consumer_ddb[0]: Creation complete after 7s [id=consumer-example-tenant-s2v]
aws_sqs_queue.consumer_sqs[0]: Creation complete after 25s [id=https://sqs.us-west-2.amazonaws.com/656796372676/consumer-example-tenant-s2v]
...

Apply complete! Resources: 11 added, 0 changed, 0 destroyed.

Outputs:
consumer = {
  "irsa_role" = "arn:aws:iam::656796372676:role/consumer-role-example-tenant"
}
producer = {
  "irsa_role" = "arn:aws:iam::656796372676:role/producer-role-example-tenant"
}

{"level":"info", "msg":"creating outputs"}
{"level":"info", "msg":"write outputs to secret"}
로그에서 주목할 플로우:
write backend config→ Terraform state를 K8s Secret으로 저장하기 위한 backend_override.tf를 동적으로 주입workspace select→ Terraform workspace 격리creating a plan→save the plan→running apply(3단계 분리)write outputs to secret→ Terraform outputs를 K8s Secret (example-tenant-infra-output)으로 기록
섹션 5.2에서 CLI로 본 "Plan: 11 to add" 와 정확히 같은 11개 리소스가 생성됨. 즉, Tofu 컨트롤러는 그 실행 과정을 K8s 컨트롤러 패턴으로 감싼 것.
AWS 리소스 검증
✅ 체크포인트: consumer-example-tenant-s2v 형태의 DynamoDB 테이블과 SQS 큐가 생성됨. 접미사 s2v는 random_string.random_suffix가 생성한 값.
5.4 GitOps 방식 리소스 삭제
GitOps의 진정한 매력은 삭제도 동일한 방식으로 수행된다는 점. 파일만 제거하면 destroyResourcesOnDeletion: true 설정에 의해 AWS 리소스도 자동으로 정리됨.
CRD 파일 삭제 및 kustomization.yaml 업데이트
rm /home/ec2-user/environment/gitops-gitea-repo/application-plane/production/tenants/example-tenant-terraform-crd.yaml

cat << EOF > /home/ec2-user/environment/gitops-gitea-repo/application-plane/production/tenants/kustomization.yaml
apiVersion: kustomize.config.k8s.io/v1beta1
kind: Kustomization
resources:
    - basic
    - advanced
    - premium
EOF
커밋 및 푸시
cd /home/ec2-user/environment/gitops-gitea-repo/
git pull origin main
git add .
git commit -m "Removed Terraform CRD and reference from kustomization.yaml"
git push origin main

flux reconcile source git flux-system
destroy 로그 확인
kubectl logs po/example-tenant-tf-runner -n flux-system -f
{"level":"info", "msg":"running apply"}
module.consumer_irsa_role[0].aws_iam_role_policy_attachment.this["policy"]: Destroying...
module.producer_irsa_role[0].aws_iam_role_policy_attachment.this["policy"]: Destroying...
aws_iam_policy.producer-iampolicy[0]: Destroying...
module.producer_irsa_role[0].aws_iam_role.this[0]: Destroying...
aws_iam_policy.consumer-iampolicy[0]: Destroying...
module.consumer_irsa_role[0].aws_iam_role.this[0]: Destroying...
aws_ssm_parameter.dedicated_consumer_ddb[0]: Destroying...
aws_ssm_parameter.dedicated_consumer_sqs[0]: Destroying...
aws_sqs_queue.consumer_sqs[0]: Destroying... [id=https://sqs.us-west-2.amazonaws.com/.../consumer-example-tenant-s2v]
aws_dynamodb_table.consumer_ddb[0]: Destroying...
...
aws_sqs_queue.consumer_sqs[0]: Still destroying... [2m0s elapsed]
aws_sqs_queue.consumer_sqs[0]: Destruction complete after 2m9s
random_string.random_suffix: Destroying...
random_string.random_suffix: Destruction complete after 0s

Apply complete! Resources: 0 added, 0 changed, 11 destroyed.
SQS Queue 삭제가 느린 이유
로그를 보면 SQS Queue 삭제에 2분 9초가 걸림. 이는 AWS SQS의 제약으로, DeleteQueue API 호출 후 실제로 큐 이름이 재사용 가능한 상태가 되기까지 최소 60초의 쿨다운 기간이 필요하기 때문. Terraform은 이 기간 동안 polling하며 완료를 확인.
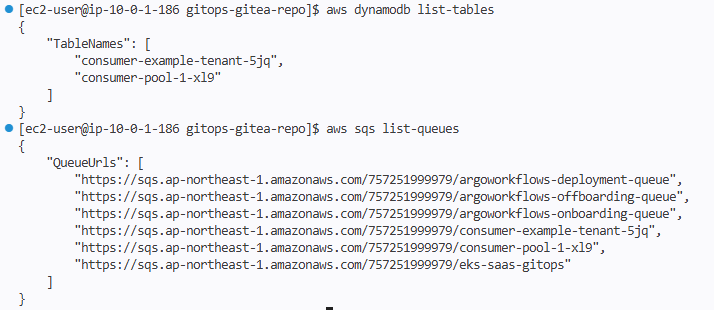
AWS 리소스 삭제 검증
$ aws dynamodb list-tables
{
    "TableNames": [
        "consumer-pool-1-hid"
    ]
}

$ aws sqs list-queues
{
    "QueueUrls": [
        "https://sqs.us-west-2.amazonaws.com/656796372676/argoworkflows-deployment-queue",
        "https://sqs.us-west-2.amazonaws.com/656796372676/argoworkflows-offboarding-queue",
        "https://sqs.us-west-2.amazonaws.com/656796372676/argoworkflows-onboarding-queue",
        "https://sqs.us-west-2.amazonaws.com/656796372676/consumer-pool-1-hid",
        "https://sqs.us-west-2.amazonaws.com/656796372676/eks-saas-gitops"
    ]
}
consumer-example-tenant-* 리소스가 모두 사라진 것을 확인. 남은 것은 consumer-pool-1-hid(pool-1 테넌트)와 Argo Workflows 관련 시스템 큐.
6. Helm 차트와 Flux의 통합
섹션 5에서 Terraform 모듈과 tf-controller로 AWS 인프라(SQS, DynamoDB, IRSA)를 GitOps 방식으로 프로비저닝하는 흐름을 확인했음. 이제 동일한 GitOps 패러다임을 Kubernetes 워크로드에 적용할 차례. 핵심은 두 가지:
- Helm 차트 — 테넌트별로 반복되는 K8s 매니페스트(Deployment, Service, Ingress, ServiceAccount)를 단일 패키지로 추상화
- HelmRelease CRD — Flux의 Helm Controller가 ECR에 저장된 OCI 차트를 감시하고 클러스터 상태와 동기화
이번 섹션에서는 차트 구조 → 로컬 렌더링 검증 → ECR OCI Registry 패키징 → HelmRelease로 GitOps 배포까지 전체 흐름을 직접 검증해볼 예정.
6.1 Helm 차트 구조 파악
먼저 저장소에 어떤 차트가 어떻게 구성되어 있는지 확인:
tree /home/ec2-user/environment/gitops-gitea-repo/helm-charts/
결과:
helm-charts/
├── helm-tenant-chart/       # 테넌트 애플리케이션용 (Producer + Consumer 묶음)
│   ├── Chart.yaml           # 차트 메타데이터 (이름, 버전, 설명)
│   ├── values.yaml          # 기본 설정값
│   └── templates/           # Kubernetes 매니페스트 템플릿
│       ├── deployment.yaml
│       ├── service.yaml
│       ├── ingress.yaml
│       ├── hpa.yaml
│       └── serviceaccount.yaml
└── application-chart/       # 애플리케이션 1:1 대응 (테넌트 구분 없음)
두 차트는 동일한 Helm 차트 메커니즘을 사용하지만 추상화 단위가 다름:
| 차트 | 용도 | 추상화 단위 | 활용처 |
|---|---|---|---|
helm-tenant-chart |
테넌트별 앱 배포 | 테넌트(=Producer + Consumer 묶음) | tenant-1, tenant-2, pool-1 등 |
application-chart |
개별 애플리케이션 배포 | 애플리케이션 | onboarding-service 등 시스템 컴포넌트 |
💡 왜 두 차트로 나누었는가?
테넌트 워크로드는 "Producer + Consumer + IRSA + Ingress 라우팅"이 항상 함께 묶여 다니는 한 단위. 반면 onboarding-service 같은 시스템 컴포넌트는 단일 애플리케이션이며 테넌트 격리 컨텍스트가 없음.
만약 두 케이스를 하나의 차트로 합쳤다면,tenantId: ""같은 빈 문자열 분기와if .Values.tenantId가드가 템플릿 곳곳에 흩어졌을 것. 추상화 단위가 다르면 차트도 분리하는 것이 합리적 — Helm 차트 설계 시 자주 놓치는 포인트.
6.2 Helm 차트 로컬 테스트
values.yaml은 values.yaml.template 파일을 기반으로 만들어져 있음. 운영 시 환경별 설정을 test-values.yaml 같은 별도 파일로 작성하고 --values 플래그로 override하는 방식.
테스트용 values 파일 생성 (Producer + Consumer 모두 활성화)
cat << EOF > /home/ec2-user/environment/gitops-gitea-repo/helm-charts/helm-tenant-chart/test-values.yaml
tenantId: "example-tenant"

apps:
  producer:
    enabled: true

  consumer:
    enabled: true
EOF
helm template 명령으로 실제 클러스터에 배포하지 않고 렌더링 결과만 확인:
helm template example-tenant ./helm-charts/helm-tenant-chart \
  --values ./helm-charts/helm-tenant-chart/test-values.yaml
핵심 결과 (요약):
# ServiceAccount — IRSA 어노테이션 자동 주입
apiVersion: v1
kind: ServiceAccount
metadata:
  name: "example-tenant-consumer"
  annotations:
    eks.amazonaws.com/role-arn: "arn:aws:iam::656796372676:role/consumer-role-example-tenant"
---
# Deployment — replicas: 3, 노드 셀렉터 `node-type: applications` 적용
apiVersion: apps/v1
kind: Deployment
metadata:
  name: example-tenant-consumer
spec:
  replicas: 3
  template:
    spec:
      serviceAccountName: example-tenant-consumer
      containers:
        - name: consumer
          image: "656796372676.dkr.ecr.us-west-2.amazonaws.com/consumer:0.1"
          livenessProbe:
            httpGet: { path: /consumer, port: http }
          readinessProbe:
            httpGet: { path: /consumer/readiness-probe, port: http }
            initialDelaySeconds: 10
            periodSeconds: 5
      nodeSelector:
        node-type: applications
      tolerations:
        - effect: NoSchedule
          key: applications
          operator: Exists
---
# Ingress — ALB 헤더 기반 라우팅 (TenantID HTTP Header)
apiVersion: networking.k8s.io/v1
kind: Ingress
metadata:
  name: "example-tenant-ingress-consumer"
  annotations:
    alb.ingress.kubernetes.io/group.name: "tenants-lb"  # ALB 공유
    alb.ingress.kubernetes.io/conditions.example-tenant-consumer: >
      [{"field":"http-header","httpHeaderConfig":{"httpHeaderName": "TenantID", "values":["example-tenant"]}}]
🔄 EKS/AWS 통합 포인트 — 자동 결합되는 두 가지 메커니즘ServiceAccount → IRSA:eks.amazonaws.com/role-arn어노테이션이 차트에서 자동 생성됨. 섹션 5에서 Terraform이 만든 IAM Role의 trust conditionsystem:serviceaccount:test:test-consumer와 정확히 매칭되는 구조 — Terraform과 Helm이tenant_id라는 단일 변수로 묶여 있음.Ingress → ALB Group:alb.ingress.kubernetes.io/group.name: "tenants-lb"어노테이션으로 모든 테넌트가 단일 ALB를 공유. AWS Load Balancer Controller의 IngressGroup 기능 — 테넌트마다 별도 ALB를 만들면 비용도 비용이지만 ALB 한도(리전당 50개) 도달 시 SaaS 확장에 치명적이므로 거의 필수 패턴.
Producer를 비활성화하면 어떻게 동작하는가?
cat << EOF > /home/ec2-user/environment/gitops-gitea-repo/helm-charts/helm-tenant-chart/test-values.yaml
tenantId: "example-tenant"

apps:
  producer:
    enabled: false

  consumer:
    enabled: true
EOF

helm template example-tenant ./helm-charts/helm-tenant-chart \
  --values ./helm-charts/helm-tenant-chart/test-values.yaml
흥미로운 결과가 나옴 (핵심 부분만 발췌):
# Producer Service — 그러나 namespace는 pool-1, selector도 pool-1-producer
apiVersion: v1
kind: Service
metadata:
  name: "example-tenant-producer"
  namespace: pool-1                    # ← 테넌트 ns가 아닌 공유 pool로!
spec:
  selector:
    app: "pool-1-producer"             # ← 공유 Pool의 Producer를 가리킴
---
# Producer Ingress — 라우팅 규칙은 그대로 남아있음
apiVersion: networking.k8s.io/v1
kind: Ingress
metadata:
  name: "example-tenant-ingress-producer"
  namespace: pool-1                    # ← pool-1 namespace의 Ingress
  annotations:
    alb.ingress.kubernetes.io/conditions.example-tenant-producer: >
      [{"field":"http-header","httpHeaderConfig":{"httpHeaderName": "TenantID", "values":["example-tenant"]}}]
spec:
  rules:
  - http:
      paths:
      - path: /producer
        backend:
          service:
            name: "example-tenant-producer"   # ← Service는 pool-1 ns에 있음
producer.enabled: false인데도 Service와 Ingress가 사라지지 않고pool-1네임스페이스에 생성됨. 셀렉터는pool-1-producer를 가리킴. 즉:Consumer는example-tenant네임스페이스 전용 Pod로 격리 (Silo)Producer는pool-1의 공유 Pod를 사용하지만, Ingress의 TenantID 헤더 매칭은 그대로 동작 (Pool)
이 한 차트로 Silo / Pool / Hybrid 세 가지 SaaS Tenancy 모델이 모두 표현 가능. 섹션 7의 Advanced 티어가 정확히 이 메커니즘 위에서 동작함. AWS의 SaaS Lens에서 말하는 Pool/Silo/Bridge 모델이 차트 한 줄(enabled: false)로 결정되는 셈.
테스트 파일 정리:
rm -rf /home/ec2-user/environment/gitops-gitea-repo/helm-charts/helm-tenant-chart/test-values.yaml
6.3 ECR에 패키징된 Helm 차트 확인
GitOps 환경에서 Flux Helm Controller가 참조할 수 있도록, Helm 차트는 OCI 호환 레지스트리(여기서는 ECR)에 패키징되어 있어야 함. ECR이 OCI artifact를 지원하기 시작한 이후로, Helm 차트도 컨테이너 이미지와 동일한 레지스트리에서 통합 관리 가능.
# ConfigMap에서 ECR 정보 추출
AWS_ACCOUNT_ID=$(kubectl get configmap saas-infra-outputs -n flux-system \
  -o jsonpath='{.data.account_id}')
ECR_HELM_CHART_URL=$(kubectl get configmap saas-infra-outputs -n flux-system \
  -o jsonpath='{.data.ecr_helm_chart_url}')
ECR_REGISTRY=$(echo $ECR_HELM_CHART_URL | cut -d'/' -f1)
ECR_REPOSITORY=$(echo $ECR_HELM_CHART_URL | cut -d'/' -f2-)
AWS_REGION=$(echo $ECR_HELM_CHART_URL | cut -d'.' -f4)

# ECR 로그인
aws ecr get-login-password --region $AWS_REGION | \
  docker login --username AWS --password-stdin $ECR_REGISTRY

# 패키징된 차트 확인
aws ecr list-images --repository-name $ECR_REPOSITORY --region $AWS_REGION
결과:
{
    "imageIds": [
        {
            "imageDigest": "sha256:0ce6b8c550c5dbd0e912f98ec35c58d1ca687b28556b561edc2172c64ae43964",
            "imageTag": "0.0.1"
        }
    ]
}
6.4 HelmRelease 개념 및 GitOps 배포
HelmRelease는 Flux가 제공하는 CRD로, Helm 릴리스를 선언적으로 관리할 수 있게 해줌. CLI에서 helm install/upgrade를 실행하는 대신, YAML로 의도(desired state)만 선언하면 Helm Controller가 자동으로 배포·업데이트를 처리.
HelmRelease (Git에 선언)
       │
       ▼
Flux Helm Controller
       │
       ▼
HelmRepository (ECR의 Helm 차트 참조)
       │
       ▼
Helm install/upgrade → Kubernetes 리소스 배포
       │
       ▼
주기적 reconcile (drift 감지 시 자동 복구)
HelmRepository 확인
kubectl get HelmRepository -n flux-system | grep -i helm-tenant-chart
helm-tenant-chart oci://656796372676.dkr.ecr.us-west-2.amazonaws.com/gitops-saas/ 18h
OCI URL 스킴을 통해 ECR을 Helm 레지스트리로 사용하고 있음을 확인.
HelmRelease YAML 작성
example-tenant에 대한 HelmRelease를 작성:
cat << EOF > /home/ec2-user/environment/gitops-gitea-repo/application-plane/production/tenants/example-tenant-helmrelease.yaml
apiVersion: v1
kind: Namespace
metadata:
  name: example-tenant
---
apiVersion: helm.toolkit.fluxcd.io/v2
kind: HelmRelease
metadata:
  name: example-tenant-premium
  namespace: flux-system
spec:
  releaseName: example-tenant-premium
  targetNamespace: example-tenant
  storageNamespace: example-tenant
  interval: 1m0s
  chart:
    spec:
      chart: helm-tenant-chart
      version: "0.x"
      sourceRef:
        kind: HelmRepository
        name: helm-tenant-chart
  values:
    tenantId: example-tenant
    apps:
      producer:
        enabled: true
      consumer:
        enabled: true
EOF
💡 세 가지 namespace 분리 — 자주 헷갈리는 포인트storageNamespace를targetNamespace와 같이 두면 테넌트 ns 삭제 시 release history도 함께 정리되어 관리가 깔끔해짐. 반대로flux-system에 두면 운영자가 모든 테넌트 history를 한 곳에서 조회 가능. 트레이드오프 — 워크숍은 전자를 선택.
kustomization.yaml에 등록
cat << EOF >> /home/ec2-user/environment/gitops-gitea-repo/application-plane/production/tenants/kustomization.yaml
    - example-tenant-helmrelease.yaml
EOF
Git 커밋 & 푸시
cd /home/ec2-user/environment/gitops-gitea-repo/
git pull origin main
git add .
git commit -m "Added HelmRelease for example-tenant"
git push origin main
Flux 강제 동기화
flux reconcile source git flux-system
tf-runner 동작 확인 — Terraform과 Helm이 함께 트리거됨
흥미롭게도, HelmRelease 추가만 했는데 tf-runner Pod가 다시 실행됨:
kubectl logs po/example-tenant-tf-runner -n flux-system -f
핵심 로그 (요약):
2026/04/14 13:32:51 Starting the runner...
{"level":"info","msg":"creating a plan"}
{"level":"info","msg":"running apply"}

random_string.random_suffix: Creating...  [id=i63]
module.producer_irsa_role[0].aws_iam_role.this[0]: Creating...
aws_sqs_queue.consumer_sqs[0]: Creating...
module.consumer_irsa_role[0].aws_iam_role.this[0]: Creating...
aws_dynamodb_table.consumer_ddb[0]: Creating...
...
Apply complete! Resources: 11 added, 0 changed, 0 destroyed.

Outputs:
consumer = { "irsa_role" = "arn:aws:iam::656796372676:role/consumer-role-example-tenant" }
producer = { "irsa_role" = "arn:aws:iam::656796372676:role/producer-role-example-tenant" }
🔄 왜 tf-runner가 다시 동작했는가?
차트의templates/terraform.yaml에 Terraform CRD가 포함되어 있기 때문. 즉, Helm이 렌더링하는 매니페스트 안에kind: Terraform리소스가 있고, 이것이 클러스터에 적용되는 순간 tf-controller가 reconcile을 시작.
즉 하나의 git push로 K8s 워크로드와 AWS 인프라가 동시에 만들어짐. 섹션 5에서 별도로 만들었던 Terraform CRD가 사실은 이 차트의templates/terraform.yaml에서 자동 생성된다는 점이 차트 통합의 핵심 트릭.
Secret 변경 모니터링
kubectl get secret -n flux-system -w
tfstate-default-example-tenant, example-tenant-infra-output 같은 Secret이 생성되는 것을 확인할 수 있음.
결과 검증
# example-tenant 네임스페이스 생성 여부
kubectl get namespaces | grep example-tenant
example-tenant Active 6m1s
# 네임스페이스 내 리소스
kubectl get all -n example-tenant
결과:
NAME                                           READY   STATUS    RESTARTS   AGE
pod/example-tenant-consumer-86c96b4dbc-d5ctv   1/1     Running   0          6m27s
pod/example-tenant-consumer-86c96b4dbc-fdkpm   1/1     Running   0          6m27s
pod/example-tenant-consumer-86c96b4dbc-gjb9t   1/1     Running   0          6m27s
pod/example-tenant-producer-74db5dcb4c-m5smd   1/1     Running   0          6m27s
pod/example-tenant-producer-74db5dcb4c-wfpq8   1/1     Running   0          6m27s
pod/example-tenant-producer-74db5dcb4c-x68hd   1/1     Running   0          6m27s

NAME                              TYPE        CLUSTER-IP      EXTERNAL-IP   PORT(S)   AGE
service/example-tenant-consumer   ClusterIP   172.20.90.180   <none>        80/TCP    6m27s
service/example-tenant-producer   ClusterIP   172.20.57.228   <none>        80/TCP    6m27s

NAME                                      READY   UP-TO-DATE   AVAILABLE   AGE
deployment.apps/example-tenant-consumer   3/3     3            3           6m27s
deployment.apps/example-tenant-producer   3/3     3            3           6m27s
# AWS 리소스
aws dynamodb list-tables
{
    "TableNames": [
        "consumer-example-tenant-i63",
        "consumer-pool-1-hid"
    ]
}
aws sqs list-queues
{
    "QueueUrls": [
        ".../consumer-example-tenant-i63",
        ".../consumer-pool-1-hid",
        ...
    ]
}
✅ 체크포인트: example-tenant 네임스페이스에 Producer/Consumer Deployment(각 3 replicas)와 Service가 생성되었고, AWS에는 전용 SQS 큐 + DynamoDB 테이블이 함께 만들어짐.
리소스 정리 — 동일하게 git에서 파일 제거
# 1. HelmRelease 파일 삭제 + kustomization.yaml에서 제거
rm /home/ec2-user/environment/gitops-gitea-repo/application-plane/production/tenants/example-tenant-helmrelease.yaml
sed -i '/example-tenant-helmrelease.yaml/d' \
  /home/ec2-user/environment/gitops-gitea-repo/application-plane/production/tenants/kustomization.yaml

# 2. Git 커밋 & 푸시
cd /home/ec2-user/environment/gitops-gitea-repo/
git pull origin main
git add .
git commit -m "Removed HelmRelease for example-tenant"
git push origin main

# 3. Flux 강제 동기화
flux reconcile source git flux-system

# 4. 정리 결과 검증
kubectl get namespaces       # example-tenant 사라짐
kubectl get all -n example-tenant  # 리소스 없음
aws dynamodb list-tables     # consumer-example-tenant-* 사라짐
aws sqs list-queues
🔐 삭제 순서가 중요한 이유
Flux가 HelmRelease를 삭제하면 Helm은 차트 안의 모든 리소스를 정리하려 시도. 이때 Terraform CR도 함께 삭제되며,destroyResourcesOnDeletion: true설정에 의해 tf-controller가terraform destroy를 실행. 만약 이 순서가 어긋나면 IAM Role을 참조하는 ServiceAccount가 살아있는 상태에서 IAM Role이 먼저 삭제되어 권한 오류가 발생할 수 있음.
Flux는 finalizer 메커니즘으로 이 순서를 보장하지만, 운영 시에는kubectl get terraform -n flux-system -w로 destroy 완료까지 모니터링하는 습관이 안전함.
6.5 Lab 1 정리 — 패턴의 일반화
여기까지의 흐름을 한 줄로 요약하면:
Git에 YAML 파일 1개 추가 → git push → 자동으로 K8s 워크로드 + AWS 인프라가 모두 프로비저닝됨
| 단계 | 도구 | 핵심 개념 | 배운 것 |
|---|---|---|---|
| Terraform 모듈 테스트 | Terraform | 인프라 추상화 | 모듈 변수로 리소스 생성 범위 제어 |
| Tofu 컨트롤러 통합 | Flux + Terraform CRD | GitOps로 IaC 자동화 | Git 파일 추가 = AWS 인프라 자동 프로비저닝 |
| Helm 차트 테스트 | Helm | 앱 패키징 | values.yaml로 배포 구성 제어 (Silo/Pool/Hybrid 분기) |
| HelmRelease 배포 | Flux + HelmRelease | GitOps로 앱 배포 | 차트 안의 Terraform CR로 인프라까지 함께 트리거 |
💡 핵심 통찰: 모든 과정이 동일한 흐름을 따름
이것이 플랫폼 엔지니어링의 "셀프서비스 인프라"가 동작하는 방식. 그러나 아직 한 가지 비효율이 남아 있음 —example-tenant-helmrelease.yaml을 매번 손으로 작성해야 한다는 것. 다음 섹션에서는 티어별 템플릿으로 이 반복을 어떻게 흡수하는지, 그리고 그 위에서 자동 온보딩(Lab 3)이 어떻게 구현되는지 살펴봄.
7. SaaS 티어 전략
SaaS는 단일 플랜으로 모든 고객을 만족시킬 수 없음. Free/Basic은 비용이 절대적으로 중요하고, Enterprise/Premium은 격리·성능·SLA가 중요함. 이 차이를 인프라 레벨에서 어떻게 표현할 것인가 — 이것이 SaaS Tenancy 모델의 핵심 질문.
이번 섹션에서는 동일한 helm-tenant-chart를 사용하면서, values 설정만으로 세 가지 다른 배포 모델(Pool / Silo / Hybrid)을 구현하는 방법을 직접 다뤄볼 예정.
7.1 티어 템플릿 탐색
tree /home/ec2-user/environment/gitops-gitea-repo/application-plane/production/tier-templates
결과:
└── tier-templates
    ├── basic_env_template.yaml
    ├── basic_tenant_template.yaml
    └── premium_tenant_template.yaml
💡 advanced_tenant_template.yaml은 아직 존재하지 않음. 이 실습에서 직접 설계하고 작성할 예정.Basic vs Premium — 양 극단부터 비교
| 구성 요소 | Basic 티어 | Premium 티어 |
|---|---|---|
| 배포 모델 | Pool (공유) | Silo (전용) |
| K8s 네임스페이스 | pool-1 (공유) |
테넌트 전용 |
| Producer | 공유 (pool-1) | 전용 배포 |
| Consumer | 공유 (pool-1) | 전용 배포 |
| SQS 큐 | 공유 | 전용 |
| DynamoDB 테이블 | 공유 | 전용 |
| Ingress | 테넌트별 라우팅만 | 전용 |
| 비용 | 낮음 | 높음 |
| 격리 수준 | 낮음 | 높음 |
| Noisy Neighbor 위험 | 높음 | 없음 |
두 모델 모두 동일한 차트를 사용한다는 점이 핵심
Pool과 Silo는 보통 다른 코드베이스/배포 파이프라인으로 구현되는 경우가 많음. 그러나 Helm values만으로 분기시키면:새 티어 추가 = 새 template 파일 1개차트 버전 업데이트 = 모든 티어가 동시에 혜택코드 중복 0
이것이 Helm을 SaaS Tenancy의 1차 추상화 레이어로 사용하는 이유.
7.2 Advanced 티어 설계
새로운 고객 세그먼트를 가정해봄: "Producer 워크로드는 균일하지만, Consumer는 데이터 격리가 필요한 고객". 예를 들어:
- Producer는 단순 메시지 발행 → 공유해도 무방
- Consumer는 고객 데이터를 처리/저장 → 격리 필요 (컴플라이언스)
이 요구사항에 맞는 것이 Hybrid 모델 = Advanced 티어:
| 컴포넌트 | 배포 전략 | 이유 |
|---|---|---|
| Producer | Pool (pool-1 공유) | 워크로드 균일, 비용 효율 |
| Consumer | Silo (테넌트 전용 ns) | 데이터 격리 필요 |
| 큐/DB | Consumer 측만 전용 | Consumer가 격리되면 큐도 격리되어야 함 |
이 설계가 Premium과 다른 점: Producer 측의 IAM Role attach 전략도 함께 바뀜. 섹션 5.2에서 본 aws_iam_role_policy_attachment.sto-readonly-role-policy-attach[0]이 정확히 이 케이스 — Producer가 비활성화된 테넌트는 공유 Pool Role을 참조하는 attachment가 추가됨.
Advanced 티어 템플릿 작성 — Premium 기반의 3가지 변경
Premium 템플릿(premium_tenant_template.yaml)을 기반으로 다음 3가지를 변경:
releaseName:premium→advancedproducer.enabled:true→false(공유 Pool 사용)producer.envId: pool-1추가 (라우팅 대상 명시)
cat << EOF > /home/ec2-user/environment/gitops-gitea-repo/application-plane/production/tier-templates/advanced_tenant_template.yaml
apiVersion: v1
kind: Namespace
metadata:
  name: {TENANT_ID}
---
apiVersion: helm.toolkit.fluxcd.io/v2
kind: HelmRelease
metadata:
  name: {TENANT_ID}-advanced
  namespace: flux-system
spec:
  releaseName: {TENANT_ID}-advanced
  targetNamespace: {TENANT_ID}
  interval: 1m0s
  chart:
    spec:
      chart: helm-tenant-chart
      version: "{RELEASE_VERSION}.x"
      sourceRef:
        kind: HelmRepository
        name: helm-tenant-chart
  values:
    tenantId: {TENANT_ID}
    apps:
      producer:
        envId: pool-1
        enabled: false      # Pool deployment — advanced tier shares with other tenants
        ingress:
          enabled: true
      consumer:
        enabled: true       # Silo deployment — advanced tier has dedicated resources
        ingress:
          enabled: true
        image:
          tag: "0.1" # {"\$imagepolicy": "flux-system:consumer-image-policy:tag"}
EOF
{TENANT_ID}같은 placeholder가 의미하는 것
이 파일은 온보딩 시sed로 치환되는 템플릿. Helm의 templating({{ .Values.tenantId }})과 헷갈리기 쉬운데, 다른 레이어임:
즉 2-stage templating 구조. 섹션 8에서 보겠지만, 1단계 치환을 사람이 하느냐(수동 온보딩) Argo Workflows가 하느냐(자동 온보딩)의 차이만 있을 뿐.
$imagepolicy 주석의 역할
마지막 라인의 주석에 주목:
image:
  tag: "0.1" # {"$imagepolicy": "flux-system:consumer-image-policy:tag"}
이것은 Flux의 Image Update Automation 기능. ECR에 새 이미지 태그가 푸시되면 consumer-image-policy가 감지하고, 이 주석이 달린 라인을 자동으로 Git에 커밋하여 tag: "0.2"로 업데이트함. 즉 이미지 빌드 → ECR 푸시 → Git 자동 커밋 → Flux reconcile → 배포 흐름이 손 안 대고 동작.
디렉토리 구조 준비
mkdir -p /home/ec2-user/environment/gitops-gitea-repo/application-plane/production/tenants/advanced
7.3 Advanced 테넌트 수동 프로비저닝
자동화는 Lab 3에서 다루고, 먼저 수동으로 온보딩 과정을 한 번 거쳐봄. 이 수동 단계를 이해해야 자동화가 무엇을 자동화하는지 명확히 보임.
export TENANT_ID=tenant-t1d6c
export RELEASE_VERSION=0.0

cd /home/ec2-user/environment/gitops-gitea-repo/application-plane/production/

# 1. 템플릿 복사
cp tier-templates/advanced_tenant_template.yaml tenants/advanced/$TENANT_ID.yaml

# 2. placeholder 치환
sed -i "s|{TENANT_ID}|$TENANT_ID|g" "tenants/advanced/$TENANT_ID.yaml"
sed -i "s|{RELEASE_VERSION}|$RELEASE_VERSION|g" "tenants/advanced/$TENANT_ID.yaml"

# 3. kustomization.yaml 생성
cat << EOF > tenants/advanced/kustomization.yaml
apiVersion: kustomize.config.k8s.io/v1beta1
kind: Kustomization
resources:
  - $TENANT_ID.yaml
EOF
이 4단계가 자동화의 대상
Lab 3의 Argo Workflows가 정확히 이 과정을 SQS 메시지 1개로 트리거되게 만들 것:메시지에서tenant_tier추출 → 어떤 템플릿을 쓸지 결정tenant_id로 placeholder 치환적절한 디렉토리(tenants/{tier}/)에 파일 생성kustomization.yaml 업데이트Git commit + push
Git 커밋 & 푸시
cd /home/ec2-user/environment/gitops-gitea-repo/
git pull origin main
git add .
git commit -am "Adding tenant-t1d6c with Advanced Tier"
git push origin main
Flux 동기화 강제
flux reconcile source git flux-system
7.4 Advanced 테넌트 검증
K8s 리소스 확인
kubectl get deployment -n tenant-t1d6c
결과 (Consumer만 전용 배포 — Producer는 없음):
NAME                       READY   UP-TO-DATE   AVAILABLE   AGE
tenant-t1d6c-consumer      3/3     3            3           2m
AWS 리소스 확인 — Consumer 측만 전용
aws dynamodb list-tables | grep tenant-t1d6c
aws sqs list-queues | grep tenant-t1d6c
tf-runner가 Terraform 적용 중일 수 있음. kubectl get pod -n flux-system | grep tf-runner로 상태 확인 후 잠시 대기.End-to-End 라우팅 테스트
ALB 도메인 확인:
APP_LB=http://$(kubectl get ingress -n tenant-t1d6c -o json | \
  jq -r .items[0].status.loadBalancer.ingress[0].hostname)
echo $APP_LB
테스트 호출:
curl -s -H "tenantID: tenant-t1d6c" $APP_LB/producer | jq
curl -s -H "tenantID: tenant-t1d6c" $APP_LB/consumer | jq
기대 결과:
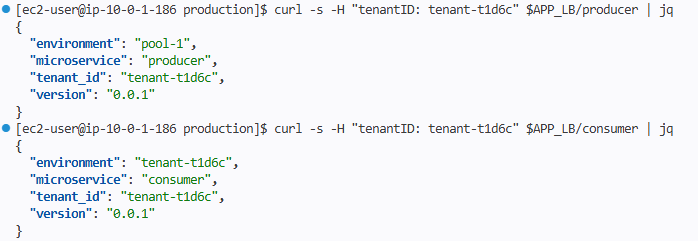
Producer의 environment: pool-1 → 공유 Pod에서 응답
- Consumer의
environment:tenant-t1d6c→ 전용 Pod에서 응답 - 양쪽 모두
tenant_id는tenant-t1d6c→ 라우팅 컨텍스트는 정확히 보존됨
이 결과가 의미하는 것
단일 ALB의 IngressGroup으로 들어온 요청이:TenantID: tenant-t1d6c헤더 매칭으로 라우팅 분기/producer경로는 →pool-1ns의 공유 Producer Service로/consumer경로는 →tenant-t1d6cns의 전용 Consumer Service로
즉 L7 라우팅 한 번으로 Pool과 Silo가 동시에 표현됨. 각 마이크로서비스 코드에는 Tenancy 모델에 대한 인지 없이도 "내가 받은 헤더 = 내 컨텍스트"라는 단순한 모델을 유지할 수 있음 — 차트 + Ingress 어노테이션 레이어가 모든 복잡성을 흡수.
7.5 Lab 2 정리 — 세 가지 티어, 하나의 차트
| 티어 | Producer | Consumer | 인프라 | 비용 | 격리 수준 | 사용 사례 |
|---|---|---|---|---|---|---|
| Basic | 공유 (pool-1) | 공유 (pool-1) | 공유 | 낮음 | 낮음 | Free/Trial 사용자 |
| Advanced | 공유 (pool-1) | 전용 | Consumer만 전용 | 중간 | 중간 | 데이터 격리 필요 고객 |
| Premium | 전용 | 전용 | 전용 | 높음 | 높음 | Enterprise SLA 고객 |
핵심 패턴: 새 티어 추가 = 새 template 파일 1개
만약 "Producer는 Silo, Consumer는 Pool인 Reverse-Hybrid 티어"가 필요하다고 가정해봄. 새 코드도, 새 차트도, 새 컨트롤러도 필요 없음:reverse_hybrid_tenant_template.yaml에서producer.enabled: true,consumer.enabled: false만 지정tenants/reverse-hybrid/디렉토리 생성끝
이것이 values 기반 정책 표현의 위력. 비즈니스 요구가 바뀔 때 변경 범위가 차트가 아닌 정책 파일에 한정됨.
8. 자동화된 테넌트 온보딩/오프보딩 (Lab 3)
Lab 2까지의 흐름을 정리하면:
- 운영자가 SSH로 접속
cp+sed로 템플릿 가공kustomization.yaml수동 편집git commit && git push- Flux가 감지하여 배포
이 과정을 하나의 SQS 메시지로 압축하는 것이 Lab 3의 목표. 핵심 통찰은 단순함:
"Argo Workflows는 Lab 1-2의 수동 작업을 그대로 재현할 뿐, GitOps의 본질은 그대로 Flux가 담당함."
Argo Workflows가 새로운 배포 메커니즘을 도입하는 것이 아니라, Git에 파일을 자동으로 커밋해주는 자동화 레이어에 불과하다는 점이 중요. 이 분리 덕분에 워크플로우가 깨져도 이미 배포된 테넌트는 영향받지 않으며, 워크플로우가 만든 결과물은 Git에 그대로 남아 감사(audit) 가능.
SQS 메시지 1개
     │
     ▼
Argo Events → Argo Workflows → Git 커밋
                                  │
                                  ▼
                           Flux → EKS 배포
                           tf-controller → AWS 리소스 생성
8.1 Argo Workflows 구성 확인
세 가지 워크플로우 템플릿이 사전 구성되어 있음:
kubectl get workflowtemplates -n argo-workflows
NAME                          AGE
tenant-deployment-template    2d
tenant-offboarding-template   2d
tenant-onboarding-template    2d
| 워크플로우 템플릿 | 역할 |
|---|---|
onboarding |
새 테넌트를 환경에 프로비저닝 (Lab 7.3의 자동화) |
offboarding |
테넌트를 환경에서 제거 (역방향) |
deployment |
테넌트 HelmRelease 버전 업데이트 (롤링 배포) |
워크플로우 정의 파일 구조:
tree /home/ec2-user/environment/gitops-gitea-repo/control-plane/production/workflows/
workflows/
├── event-bus.yaml                              # Argo Events EventBus (NATS)
├── kustomization.yaml
├── tenant-deployment-sensor.yaml               # SQS 메시지 → Workflow 트리거
├── tenant-deployment-workflow-template.yaml
├── tenant-offboarding-sensor.yaml
├── tenant-offboarding-workflow-template.yaml
├── tenant-onboarding-sensor.yaml
└── tenant-onboarding-workflow-template.yaml
온보딩 흐름 시각화
SQS 메시지 수신
     │ {"tenant_id": "tenant-1", "tenant_tier": "premium", "release_version": "0.0"}
     ▼
Argo Events Source (SQS Trigger)
     │
     ▼
Argo Events Sensor (이벤트 → Workflow 변환)
     │
     ▼
tenant-onboarding-template Workflow 실행
     │
     ├─ Step 1: Gitea 저장소 clone
     ├─ Step 2: tenant_tier 기반 템플릿 선택
     ├─ Step 3: placeholder 치환 ({TENANT_ID}, {RELEASE_VERSION})
     ├─ Step 4: tenants/{tier}/ 디렉토리에 파일 생성
     ├─ Step 5: kustomization.yaml 업데이트
     └─ Step 6: git commit && git push
                              │
                              ▼
                     Flux source-controller 감지
                              │
                              ▼
                     EKS 워크로드 배포 + tf-controller 트리거
8.2 Premium 티어 테넌트 온보딩
SQS 큐 URL 추출
export ARGO_WORKFLOWS_ONBOARDING_QUEUE_SQS_URL=$(kubectl get configmap saas-infra-outputs \
  -n flux-system -o jsonpath='{.data.argoworkflows_onboarding_queue_url}')
echo $ARGO_WORKFLOWS_ONBOARDING_QUEUE_SQS_URL
메시지 발송
aws sqs send-message \
    --queue-url $ARGO_WORKFLOWS_ONBOARDING_QUEUE_SQS_URL \
    --message-body '{
        "tenant_id": "tenant-1",
        "tenant_tier": "premium",
        "release_version": "0.0"
    }'
이 한 줄이 Lab 7.3에서 했던 모든 수동 작업을 트리거함.
워크플로우 실행 확인
kubectl -n argo-workflows get workflow
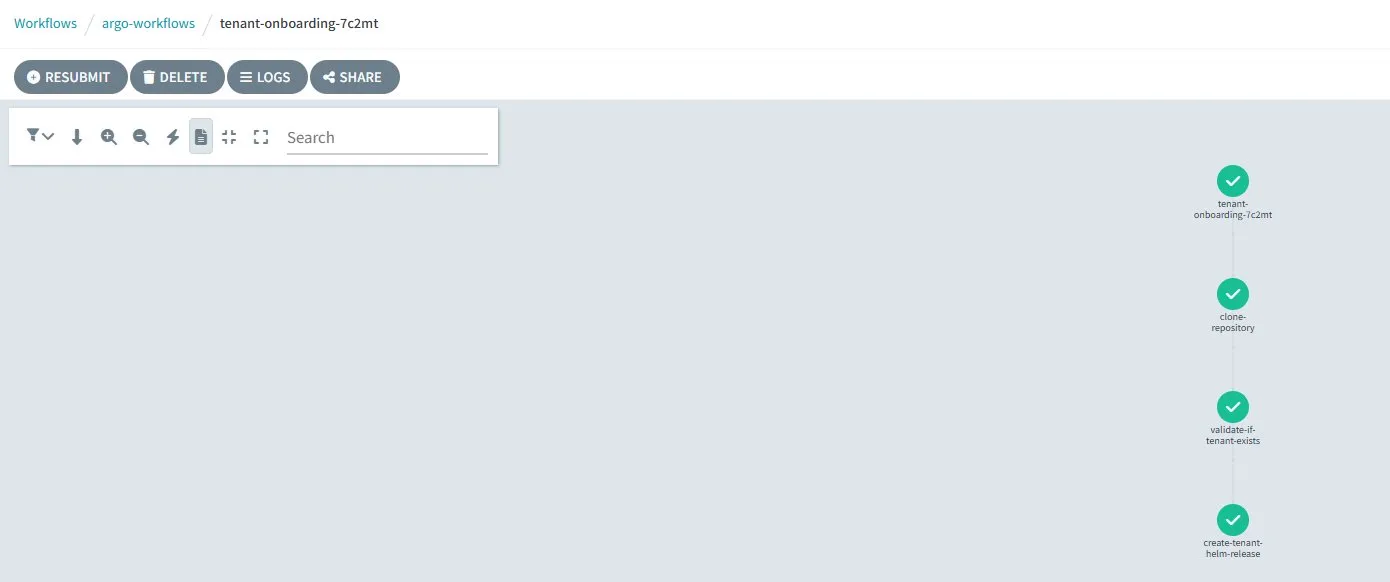
NAME                      STATUS    AGE   MESSAGE
tenant-onboarding-gzt4s   Running   9s
Argo Workflows Web UI 접속
ARGO_WORKFLOW_URL=$(kubectl -n argo-workflows get service/argo-workflows-server \
  -o json | jq -r '.status.loadBalancer.ingress[0].hostname')
echo http://$ARGO_WORKFLOW_URL:2746/workflows
브라우저로 접속하면 DAG 형태로 각 단계의 진행 상황과 로그를 시각적으로 확인 가능.
Gitea 저장소 검증 — 무엇이 자동 커밋되었는가
워크플로우가 완료되면 Gitea Web UI에 자동 커밋이 기록되어 있음:
export GITEA_PUBLIC_IP=$(kubectl get configmap saas-infra-outputs -n flux-system \
  -o jsonpath='{.data.gitea_public_url}')
export GITEA_ADMIN_PASSWORD=$(aws ssm get-parameter \
  --name "/eks-saas-gitops/gitea-admin-password" --with-decryption \
  --query 'Parameter.Value' --output text)

echo "URL: $GITEA_PUBLIC_IP"
echo "Username: admin"
echo "Password: $GITEA_ADMIN_PASSWORD"
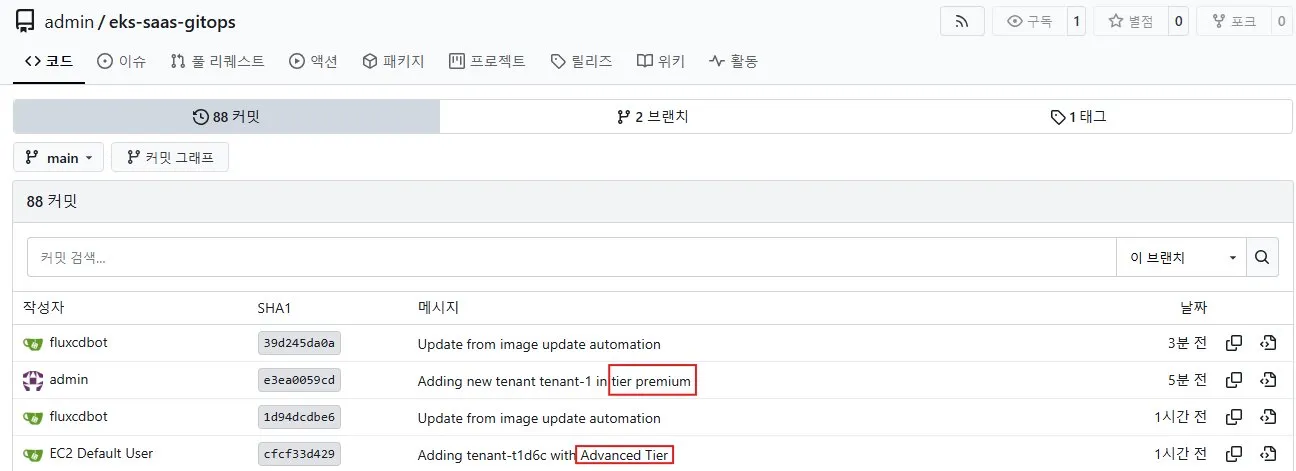
tenants/premium/tenant-1.yaml 파일이 자동 생성되어 있고, Lab 7.3에서 손으로 작성했던 것과 동일한 구조임을 확인 가능. 이 시점부터는 Flux가 익숙한 GitOps 흐름으로 처리.
8.3 Basic 티어 테넌트 온보딩
tenant_tier만 basic으로 변경:
aws sqs send-message \
    --queue-url $ARGO_WORKFLOWS_ONBOARDING_QUEUE_SQS_URL \
    --message-body '{
        "tenant_id": "tenant-2",
        "tenant_tier": "basic",
        "release_version": "0.0"
    }'
워크플로우는 티어를 모른다 — 티어가 워크플로우를 결정한다
워크플로우 자체에는 "Basic이면 X를 하라" 같은 분기가 없음. 단지 메시지의 tenant_tier 값을 받아서:
tier-templates/{tier}_tenant_template.yaml을 가져옴tenants/{tier}/디렉토리에 결과물을 둠
즉 티어별 분기 로직은 모두 템플릿 파일에 캡슐화되어 있음. 이 덕분에 새 티어 추가 시 워크플로우 코드를 수정할 필요가 없고, 템플릿 파일만 추가하면 끝. Lab 2의 Advanced 티어가 정확히 이 방식으로 자연스럽게 워크플로우에 통합되는 이유.
8.4 Advanced 티어 테넌트 온보딩
aws sqs send-message \
    --queue-url $ARGO_WORKFLOWS_ONBOARDING_QUEUE_SQS_URL \
    --message-body '{
        "tenant_id": "tenant-3",
        "tenant_tier": "advanced",
        "release_version": "0.0"
    }'

워크플로우 완료 후 Gitea에서 tenants/advanced/tenant-3.yaml을 확인하면 Lab 7.3에서 수동으로 만든 tenant-t1d6c.yaml과 동일한 구조:
enable_producer: false→ Producer는 공유 pool-1 사용enable_consumer: true→ Consumer는 전용tenant-3네임스페이스에 배포tenant-3네임스페이스도 함께 자동 생성
8.5 리소스 검증 — 세 티어가 한 클러스터에서 공존
Git 동기화
cd /home/ec2-user/environment/gitops-gitea-repo
git pull origin main

tree application-plane/production/tenants/
├── advanced
│   ├── kustomization.yaml
│   ├── tenant-3.yaml
│   └── tenant-t1d6c.yaml          # Lab 2에서 수동 생성한 테넌트
├── basic
│   ├── kustomization.yaml
│   └── tenant-2.yaml
├── kustomization.yaml
└── premium
    ├── kustomization.yaml
    └── tenant-1.yaml
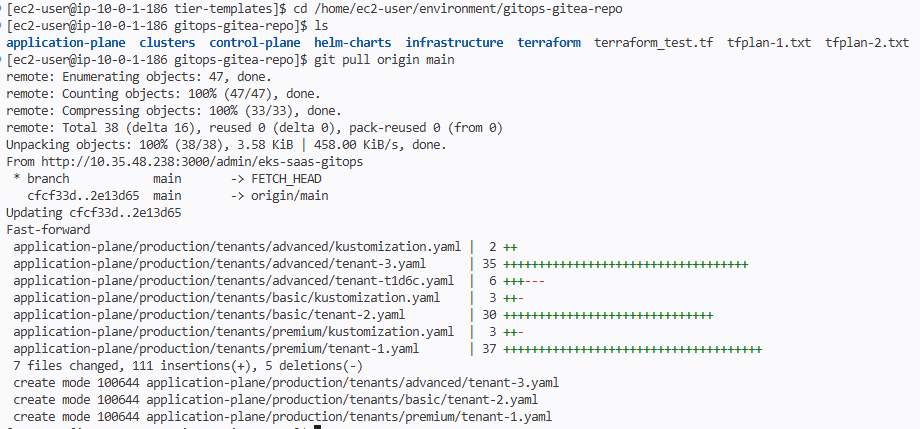
수동(tenant-t1d6c)과 자동(tenant-1/2/3) 온보딩 결과물이 같은 디렉토리에 공존함을 확인 — 자동화는 수동 프로세스를 대체하는 것이 아니라 보강함.
Flux HelmRelease 상태
flux get helmreleases

3개 테넌트 모두 READY=True 상태. 만약 Progressing 상태가 보이면 잠시 대기 후 재확인:
flux reconcile source git flux-system
모든 테넌트가 동일한 차트의 같은 버전을 사용:
flux get sources chart
💡 이 사실의 운영적 의미
차트 0.0.2 패치를 ECR에 푸시하면, HelmRelease의version: "0.x"와일드카드 매칭에 의해 세 테넌트가 동시에 자동 업데이트됨. 이것이 잘못 동작하면 모든 고객에게 동시에 영향. 그래서 보통:dev/staging 클러스터에서 먼저 검증카나리 테넌트 그룹부터 점진 배포 (Argo Rollouts나 Flagger 활용)version: "0.0.1"처럼 정확한 버전 pin도 옵션
Lab 3의tenant-deployment-template이 정확히 이런 staggered deployment를 구현하기 위한 워크플로우 — 도전과제 2로 다뤄볼 가치 있음.
클러스터 리소스 — 티어별 차이가 그대로 드러남
# Premium — Producer + Consumer 모두 전용
kubectl -n tenant-1 get deployment
NAME                READY   UP-TO-DATE   AVAILABLE   AGE
tenant-1-consumer   3/3     3            3           5m48s
tenant-1-producer   3/3     3            3           5m48s
# Basic — 전용 Deployment 없음 (pool-1 공유 사용)
kubectl -n tenant-2 get deployment
No resources found in tenant-2 namespace.
# Advanced — Consumer만 전용
kubectl -n tenant-3 get deployment
NAME                READY   UP-TO-DATE   AVAILABLE   AGE
tenant-3-consumer   3/3     3            3           4m29s
# Pool-1 — Basic + Advanced의 Producer 워크로드 흡수
kubectl -n pool-1 get deployment
NAME              READY   UP-TO-DATE   AVAILABLE   AGE
pool-1-consumer   3/3     3            3           18h
pool-1-producer   3/3     3            3           18h
Pool-1 Ingress — 라우팅 규칙이 어떻게 누적되는가
kubectl get ingress -n pool-1
흥미로운 점: pool-1 namespace에는 Basic 테넌트(tenant-2)의 producer/consumer 라우팅 규칙과 Advanced 테넌트(tenant-3)의 producer 라우팅 규칙이 함께 존재함. ALB IngressGroup이 이를 모두 단일 ALB의 listener rule로 통합 — TenantID 헤더 기반 분기가 동시에 여러 개 추가되는 구조.
Terraform State 확인
kubectl get secrets -n flux-system | grep -i state
tfstate-default-pool-1       Opaque   1   44m
tfstate-default-tenant-1     Opaque   1   23m
tfstate-default-tenant-2     Opaque   1   15m
tfstate-default-tenant-3     Opaque   1   10m
💡 Basic 티어에도 Terraform state가 있는 이유
Basic은 K8s 워크로드를 공유하지만, 일부 인프라 메타데이터(IAM Role attachment, SSM Parameter)는 테넌트별로 관리됨. 즉 Basic = "완전한 Pool"이 아니라 "워크로드만 Pool, 컨트롤 데이터는 Silo"인 hybrid 구조. 이 차이가 나중에 한 테넌트만 다른 티어로 마이그레이션할 때 중요해짐.
8.6 마이크로서비스 End-to-End 검증
ALB 도메인 추출
export APP_LB=http://$(kubectl get ingress -n tenant-1 -o json | \
  jq -r .items[0].status.loadBalancer.ingress[0].hostname)
모든 테넌트가 동일한 ALB를 공유함. ns가 달라도 같은 ALB 도메인이 반환됨.
tenant-1 (Premium) 테스트
curl -s -H "tenantID: tenant-1" $APP_LB/producer | jq
curl -s -H "tenantID: tenant-1" $APP_LB/consumer | jq
{ "environment": "tenant-1", "microservice": "producer", "tenant_id": "tenant-1", "version": "0.0.1" }
{ "environment": "tenant-1", "microservice": "consumer", "tenant_id": "tenant-1", "version": "0.0.1" }
tenant-2 (Basic) 테스트
curl -s -H "tenantID: tenant-2" $APP_LB/producer | jq
curl -s -H "tenantID: tenant-2" $APP_LB/consumer | jq
{ "environment": "pool-1", "microservice": "producer", "tenant_id": "tenant-2", "version": "0.0.1" }
{ "environment": "pool-1", "microservice": "consumer", "tenant_id": "tenant-2", "version": "0.0.1" }
tenant-3 (Advanced) 테스트
curl -s -H "tenantID: tenant-3" $APP_LB/producer | jq
curl -s -H "tenantID: tenant-3" $APP_LB/consumer | jq
{ "environment": "pool-1",   "microservice": "producer", "tenant_id": "tenant-3", "version": "0.0.1" }
{ "environment": "tenant-3", "microservice": "consumer", "tenant_id": "tenant-3", "version": "0.0.1" }
티어별 환경 매핑 정리
| 테넌트 | 티어 | Producer 환경 | Consumer 환경 |
|---|---|---|---|
| tenant-1 | Premium | tenant-1 (전용) |
tenant-1 (전용) |
| tenant-2 | Basic | pool-1 (공유) |
pool-1 (공유) |
| tenant-3 | Advanced | pool-1 (공유) |
tenant-3 (전용) |
Lab 7에서 설계한 매핑이 그대로 데이터로 검증됨.
인프라 레벨 검증 — DynamoDB까지 데이터가 흐르는가
마이크로서비스 응답만으로는 부족함. 실제 데이터가 격리된 큐와 테이블로 정확히 흐르는지 확인:
# tenant-3에 POST 요청 → Producer가 SQS에 메시지 발행
curl --location --request POST "$APP_LB/producer" \
  --header 'tenantID: tenant-3' \
  --header 'tier: advanced'

# tenant-3 전용 DynamoDB 테이블 식별 (랜덤 suffix 포함)
TABLE_NAME=$(aws dynamodb list-tables --region $AWS_REGION \
  --query "TableNames[?contains(@, 'tenant-3')]" --output text)
echo $TABLE_NAME

# 테이블 내용 확인
aws dynamodb scan --table-name $TABLE_NAME --region $AWS_REGION
기대 결과:
{
    "Items": [
        {
            "consumer_environment": { "S": "tenant-3" },
            "producer_environment": { "S": "pool-1" },
            "message_id": { "S": "721accc6-e2c5-4885-b8a5-afc13c247cec" },
            "tenant_id": { "S": "tenant-3" },
            "timestamp": { "S": "2026-04-14T16:31:39+0000" }
        }
    ],
    "Count": 1
}
이 한 행이 증명하는 것producer_environment: pool-1+consumer_environment: tenant-3이 같은 행에 기록됨. 즉:공유 Producer가 tenant-3 컨텍스트로 메시지 발행메시지가 tenant-3 전용 SQS 큐로 라우팅tenant-3 전용 Consumer가 큐에서 폴링tenant-3 전용 DynamoDB 테이블에 저장
Hybrid 모델이 데이터 레벨까지 정합성을 유지함을 의미. 이런 검증 없이 운영에 들어가면 "왜 tenant-3 데이터가 pool-1 테이블에 들어가지" 같은 사고가 발생 — End-to-End 검증의 가치.
8.7 테넌트 오프보딩 — 동일한 패턴의 역방향
Lab 2에서 수동으로 만든 tenant-t1d6c를 오프보딩으로 정리.
오프보딩 SQS 큐로 메시지 발송
export ARGO_WORKFLOWS_OFFBOARDING_QUEUE_SQS_URL=$(kubectl get configmap saas-infra-outputs \
  -n flux-system -o jsonpath='{.data.argoworkflows_offboarding_queue_url}')

aws sqs send-message \
    --queue-url $ARGO_WORKFLOWS_OFFBOARDING_QUEUE_SQS_URL \
    --message-body '{
        "tenant_id": "tenant-t1d6c",
        "tenant_tier": "advanced"
    }'
워크플로우 모니터링
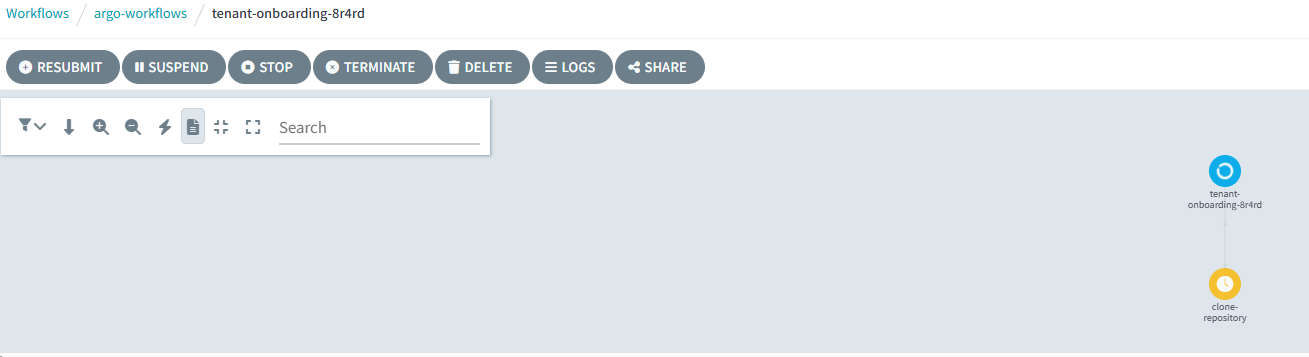
kubectl -n argo-workflows get workflow
NAME                       STATUS    AGE   MESSAGE
tenant-offboarding-gzt4s   Running   9s
UI에서도 확인:
ARGO_WORKFLOW_URL=$(kubectl -n argo-workflows get service/argo-workflows-server \
  -o json | jq -r '.status.loadBalancer.ingress[0].hostname')
echo http://$ARGO_WORKFLOW_URL:2746/workflows
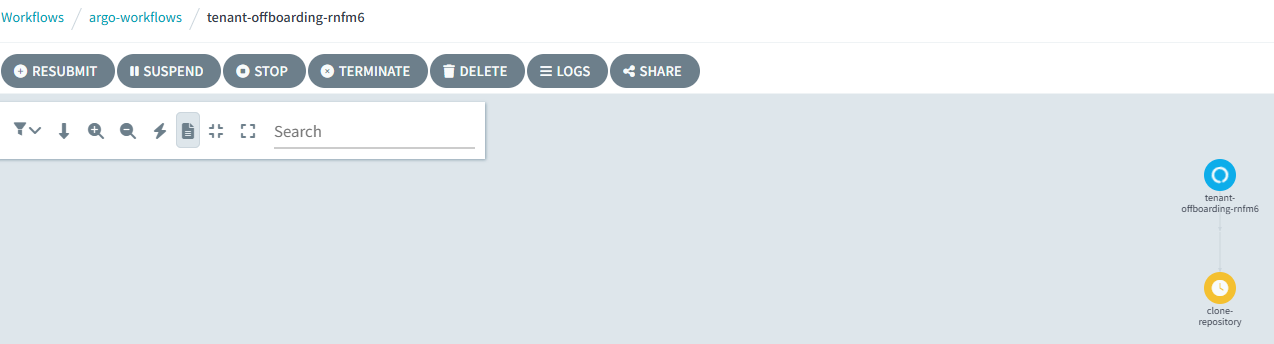
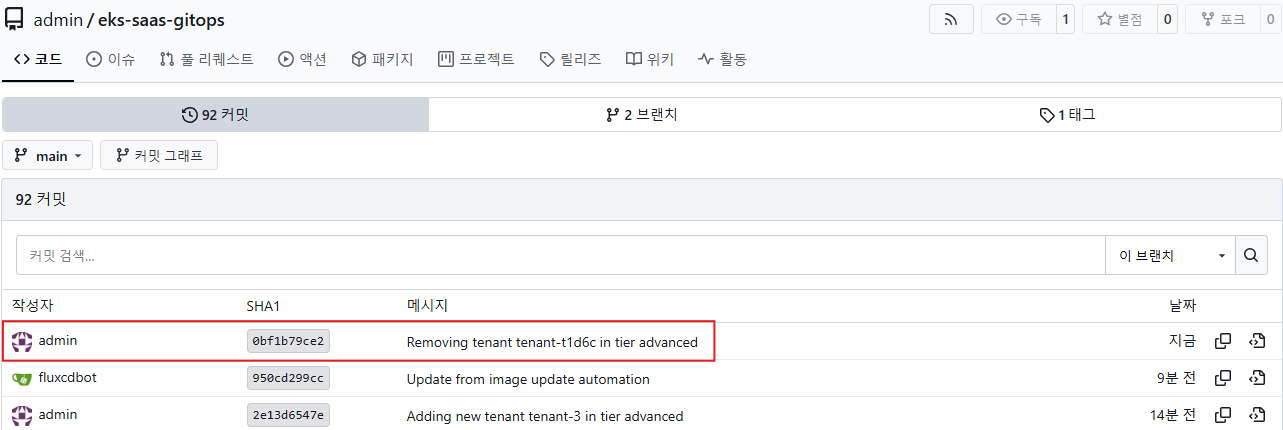
오프보딩 워크플로우는 정확히 온보딩의 역방향:
- Gitea 저장소 clone
tenants/{tier}/{tenant_id}.yaml파일 삭제kustomization.yaml에서 해당 reference 제거- git commit + push
이후는 Lab 6.4의 삭제 흐름과 동일:
- Flux가 HelmRelease 삭제 감지
- Helm Controller가 차트 리소스 정리
- 차트 안의 Terraform CR 삭제 → tf-controller가
destroyResourcesOnDeletion: true로 AWS 리소스 정리 - finalizer 메커니즘으로 순서 보장